Jekyll Website Performance Improvement
This article provides practical tips on how to optimize the loading speed of your website. Some advice specifically aims at users of Jekyll, the blog-enabled static site generator. However, the basic ideas also apply to other tools and should therefore be easy to transfer.
Note: This is an article written by and for the occasional web developer. If you’re a professional full-time web developer, you might know much of the content. I still encourage you to continue reading, though!
Why Care?
Why should you care about performance? We’ve got tiny supercomputers in our pockets, so who cares? And aren’t static websites such as those generated by Jekyll super fast out of the box? Well, not so fast.
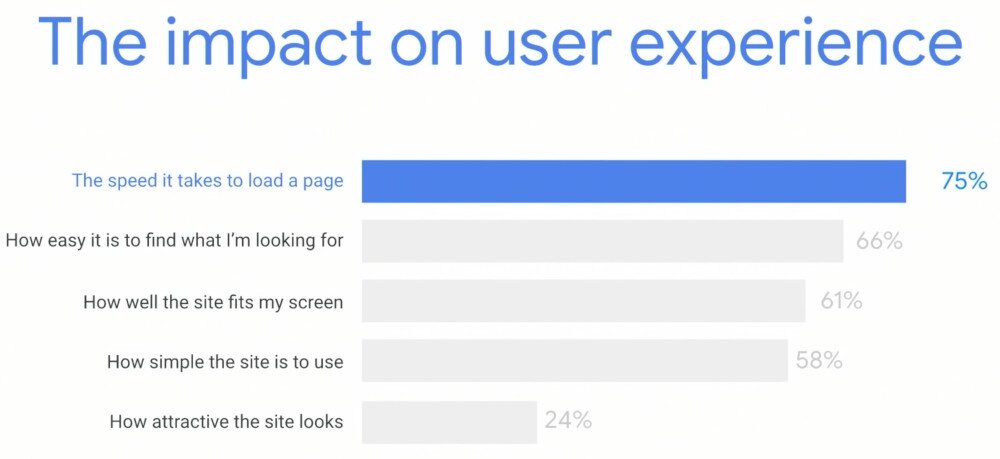
Performance matters a lot, and tiny improvements can make a vast difference. According to research from Google, the speed it takes to load a page has an impact of around 75% for user experience, clearly above other criteria such as ease of use or attractiveness:

If you would like to learn more, have a look at this talk from Google’s 2019 I/O conference:
When it comes to static websites the situation surely is not as bad as in other cases. Remember Flash, anyone? However, investigating performance more closely reveals opportunities for optimization even for static sites.
Performance Analysis
First, we need to measure performance before we can optimize it. My current tool of choice is Google’s Lighthouse. You can either run it in a browser through Chrome Dev Tools or online at Google’s web.dev pages.
Lighthouse not only analyzes raw performance but also provides insight into how well your website performs according to
- Accessibility
- Best practices
- Search engine optimization
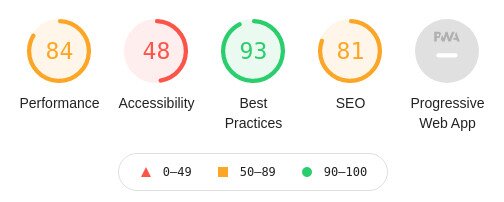
Here’s what I got for an older version of my site using Chrome Dev Tools:

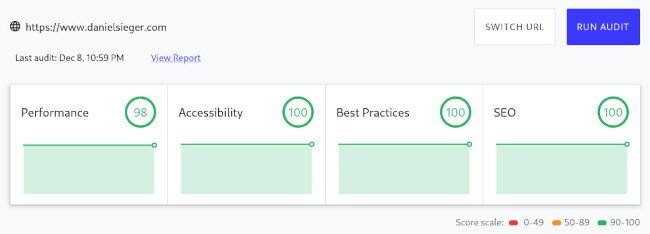
That’s quite a bit of red and orange. In contrast, this is what I get after optimization, using web.dev this time:

Read on to see how you might get there as well.
Minification
Low-hanging fruits first.
A straightforward way to reduce the size of your pages is to minify the HTML code. Just like other text-based formats, HTML can be minified by reducing white space, comments, newlines, or optional closing tags.
There is a Jekyll plugin that exactly does that job for you: jekyll-compress-html. The usage is super simple:
- Download the
compress.htmlfile from the repository - Copy it to the
_layoutsfolder of your Jekyll website -
Edit your top-level layout file (usually
default.html) to have the following front matter:--- layout: compress ---
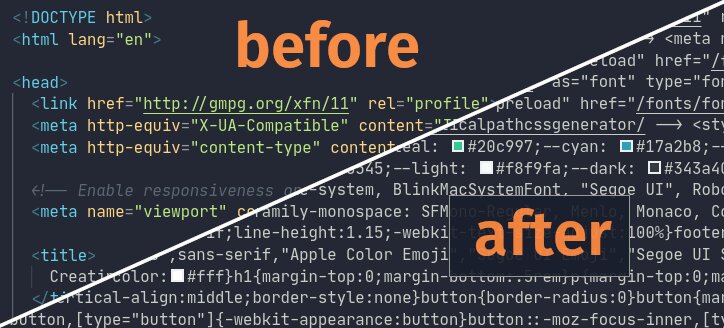
This will change your HTML code from something nicely formatted and human-readable to something much more compact. Here is a comparison before and after enabling minification:

This saves about 1K in size on a random HTML page of mine. Doesn’t sound too impressive, but Lighthouse already shows some improvement.
Only Include What You Need
From here on things get slightly more complicated, but the gain in speed is also significantly greater. Hang tight.
Depending on your Jekyll setup, you eventually include a lot of additional assets like CSS frameworks, JavaScript libraries, or custom fonts. Chances are that you only need a subset of them.
I use Bootstrap to build this site (see this post), which depends on jQuery. Both libraries are quite heavyweight. Turns out I only need a fraction of them, offering an excellent opportunity for size reduction.
Bootstrap
I compile my own version of Bootstrap using Sass, see this post for details. Therefore, I can easily configure which CSS modules to include from the Bootstrap distribution. Here is my top-level bootstrap.scss file with all unused modules commented out:
@import "functions";
@import "variables";
@import "mixins";
@import "root";
@import "reboot";
@import "type";
@import "images";
@import "code";
@import "grid";
@import "tables";
/* @import "forms"; */
/* @import "buttons"; */
@import "transitions";
/* @import "dropdown"; */
/* @import "button-group"; */
/* @import "input-group"; */
/* @import "custom-forms"; */
@import "nav";
@import "navbar";
/* @import "card"; */
/* @import "breadcrumb"; */
/* @import "pagination"; */
/* @import "badge"; */
/* @import "jumbotron"; */
/* @import "alert"; */
/* @import "progress"; */
/* @import "media"; */
/* @import "list-group"; */
/* @import "close"; */
/* @import "toasts"; */
/* @import "modal"; */
/* @import "tooltip"; */
/* @import "popover"; */
/* @import "carousel"; */
/* @import "spinners"; */
@import "utilities";
/* @import "print"; */
That’s more than half of the modules, and I’m sure I could optimize this even further after more careful investigation.
jQuery
The Bootstrap JavaScript code depends on jQuery, which is quite a heavy library providing a lot of functionality. The good news is: As long as you are only using the CSS part of Bootstrap, you are fine not to include it.
Check if you really need the Bootstrap JavaScript modules. If not, just remove the corresponding <script> tags for both from your template and watch your performance score improving.
In my case, I still use jQuery to retrieve comments on blog posts via GitHub, see this post for details. However, instead of including jQuery by default on all pages, I now only include it on blog posts using the comment functionality:
{% if page.issue and site.github_comments_repository %} ...
<script src="/js/jquery.min.js"></script>
... {% endif %}
I admit that it is still overkill include jQuery just to retrieve some data from GitHub. I’m sure there are more lightweight alternatives.
MathJax
Many technical blogs include support for MathJax, a convenient way to typeset mathematical formulas in your posts. Again, this is quite a heavy dependency pulling in lots of JavaScript code.
Similarly, the solution is to use conditional inclusion: Only include MathJax when you really need it. Here, a dedicated front-matter variable in posts needing MathJax support will do the trick:
---
title: Fancy Post With Lots of Math
mathjax: true
---
Next, change your layout or include file (depending on where you actually include MathJax) to check for the variable being defined:
{% if page.mathjax %}
<script type="text/x-mathjax-config">
  <!-- your config here -->
</script>
<script async src="/MathJax.js?config=TeX-AMS_HTML"></script>
{% endif %}
Note the async attribute above to enable asynchronous loading of the script. This eventually enhances performance in case you actually use MathJax.
Deferred Loading
As shown above, adding the async attribute to <script> tags is one way to improve page load time for scripts that you absolutely have to load. Using the defer attribute is another alternative. See the script HTML element documentation for more information.
Another commonly used technique is to defer the loading by placing your <script> tags at the very end of the document. However, you should not need this anymore when using the async or defer attributes.
For more information on how to eliminate render-blocking resources, please see the corresponding Google Developers page.
Inline Critical CSS
Another optimization technique is to inline CSS code directly into the HTML document instead of loading an external script. The key point is to inline only critical CSS styles needed to render the first paint and make the core functionality work.
I adopted a simple version of this by using an online critical path CSS generator. This takes your website URL and the full CSS code as input and generates a small set of critical CSS styles to include directly in your HTML header.
The resulting CSS looks far from being optimal, but for the moment it works fine. I am sure there are better alternatives out there. Maybe you know something that integrates well with Jekyll? Drop me a mail.
Asynchronous Loading of CSS
Another tweak I applied was to defer loading of the full CSS files using a hack creative solution based on the media attribute.
<link
  rel="stylesheet"
  href="style.css"
  media="print"
  onload="this.media='all'"
/>
Note that this requires inlining of critical CSS, otherwise you will get ugly “Flashes of Unstyled Content” (FOUC). See the full description at css-tricks.com for more details.
Fonts
Custom web fonts are popular and available to everyone through services like Google Fonts. However, ask yourself if you really need them.
As an alternative, consider using a system font stack relying on fonts already installed on the user’s system. This offers significant performance gains since
- there are no font files to transfer and load
- the browser likely has the fonts cached
All major operating systems include somewhat decent fonts these days, so this really is an alternative. Plus, the system fonts match the look and feel of the operating system, so users are used to it.
Here’s one way to use system fonts:
body {
  font-family: -apple-system, BlinkMacSystemFont, "Segoe UI", Roboto, Helvetica,
    Arial, sans-serif, "Apple Color Emoji", "Segoe UI Emoji", "Segoe UI Symbol";
}
However, if you are like me and want more precise control over the fonts being used, there are some guidelines to do this efficiently:
- Host the fonts yourself if possible. This avoids additional connection requests and/or name resolution.
- Use
font-display: swapin the@font-facedefinition to make sure text remains visible while the browser loads the fonts. - Reduce the size of the font files by sub-setting. Only include the glyphs for the languages you are using.
-
Pre-load essential font files by adding appropriate special tags to your header:
<link
  rel="preload"
  href="/font.woff2"
  as="font"
  type="font/woff2"
  crossorigin
/>
Last remark: Popular icon font sets such as Font Awesome are quite heavy as well. The latter contains something around 1000 icons (depending on your version), and I doubt you really need all of them. Consider creating a customized version containing only the icons you actually use. However, this is a story for another day. Time to wrap up.
Summary
In this article, I showed a few basic techniques to optimize the performance of your website, with a particular focus on Jekyll users.
There are plenty of ways to optimize the speed of your website even further. Images are one area I didn’t cover. There is a lot to gain from using modern image formats and compression. You can also provide images in different pre-scaled resolutions so that the browser has less work to do.
However, these examples also show that optimization usually comes with a certain cost in terms of
- implementation effort and
- maintenance overhead.
Some techniques described here make maintenance and development much more cumbersome. The manual inlining of critical CSS is one such example. It requires manual updates whenever you change one of your critical styles. There are better solutions out there, but I did not yet investigate in detail.
Do you have further advice on performance optimization? Something easy and efficient based on Jekyll? Drop me a mail.
☞ Subscribe for updates on new blog posts.
